SwiftUI15 min readMay 30, 2026

Mastering the SwiftUI App Lifecycle: iOS 14+ Development

Understanding the SwiftUI App Lifecycle is crucial for building maintainable and responsive applications. This guide covers how `App`, `Scene`, and `View` lifecycles interact, focusing on changes introduced with iOS 14 and beyond. You'll learn to handle state, background tasks, and scene management effectively.

Mastering the SwiftUI App Lifecycle: iOS 14+ Development

Introduction to the SwiftUI App Lifecycle

Before iOS 14, UIKit applications typically used AppDelegate.swift and SceneDelegate.swift to manage the application's lifecycle. While these files still exist for interoperability and specific use cases, SwiftUI applications, especially those targeting iOS 14 and later, introduced a new, declarative way to define your app's structure and manage its lifecycle: the App protocol.

The App protocol provides the entry point for your SwiftUI application. Instead of inheriting from UIApplicationDelegate, your main application structure now conforms to App. This shift significantly streamlines app setup and makes it more Swift-native. At its core, the SwiftUI App Lifecycle defines how your application launches, how its scenes (windows or tabs) behave, and how it responds to system events like backgrounding or termination.

Understanding this lifecycle is fundamental. Without it, you might struggle with data persistence, background task execution, or correctly reacting to user interactions when your app is brought to the foreground or sent to the background. This article will guide you through the modern SwiftUI App Lifecycle, focusing on the key components and how to leverage them for robust application development, specifically for iOS 14 and later.

The App Protocol: Your Application's Entry Point

The App protocol is the heart of your SwiftUI application. Every SwiftUI application must have one type that conforms to App. This type declares the content of your app, which is composed of one or more Scene instances. Think of the App protocol as replacing the role of UIApplicationMain and the AppDelegate's initial setup in older UIKit applications.

When you create a new SwiftUI project, Xcode automatically generates a file that looks something like this:

The @main attribute indicates that this struct is the entry point for your application. The body property returns one or more Scene instances that define the windows or UI that your app displays. It's crucial to understand that the App instance itself is quite lightweight; its primary role is to declare your app's scene graph.

For example, a typical app might use a WindowGroup as its main scene. WindowGroup is a flexible scene type that can display one or more instances of the same content, especially useful for multi-window iPad or macOS apps, but also the standard for single-window iPhone apps. Other scene types include Settings for macOS, DocumentGroup for document-based apps, and MenuBarExtra for macOS menu bar apps.

You typically won't manage state directly within the App struct for most application logic. Instead, you'll pass environment objects, state objects, or observed objects down to your scenes and views, allowing for a clean separation of concerns.

Compatibility: iOS 14.0+, macOS 11.0+, tvOS 14.0+, watchOS 7.0+

swift
import SwiftUI

@main
struct MyApp: App {
    var body: some Scene {
        WindowGroup {
            ContentView()
        }
    }
}

Scenes and ScenePhase: Managing UI State

Within the App protocol's body, you declare Scenes. A Scene manages a distinct piece of UI that SwiftUI can present to the user. For most iPhone apps, you'll primarily use WindowGroup to define your main UI. However, on iPad and Mac, WindowGroup allows for multiple windows of the same content to be opened, significantly enhancing multi-tasking capabilities.

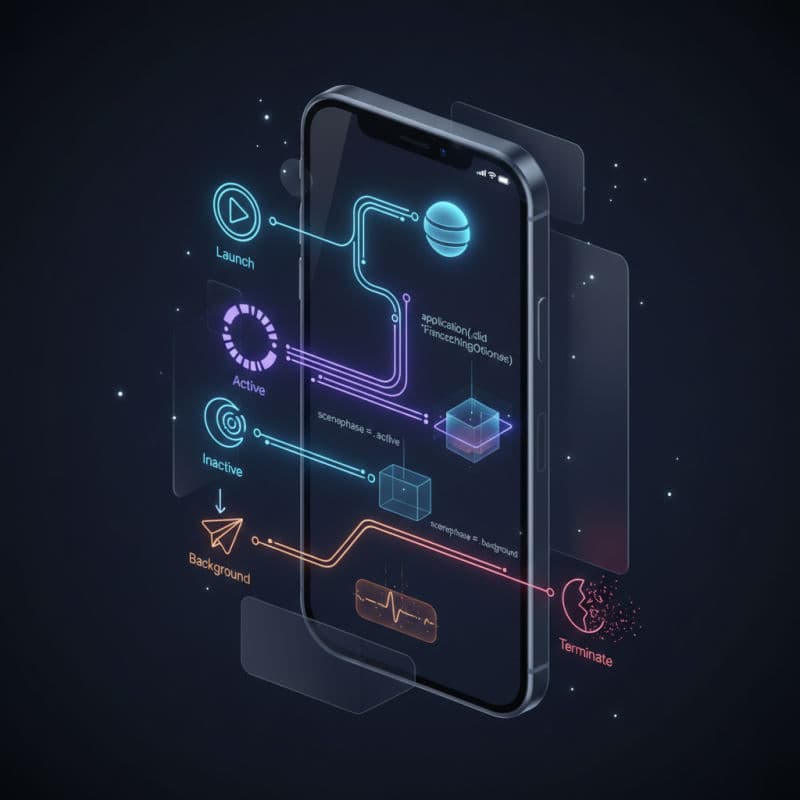
An essential concept for managing scene-level state is ScenePhase. The ScenePhase environment value provides information about the current state of a scene. You can read this value using the @Environment property wrapper. Its possible values are:

  • .active: The scene is front-most and interactive.
  • .inactive: The scene is visible but not interactive, such as when a system alert is presented over your app, or the app is transitioning to the background.
  • .background: The scene is not visible, and its process might be suspended or terminated soon.

By monitoring ScenePhase, you can perform actions when your app comes to the foreground, goes to the background, or becomes inactive. This is critical for tasks like saving user data, releasing resources, or refreshing UI elements.

Let's look at an example where you might save data when the app enters the background and refresh data when it becomes active. You'll typically use the onChange(of:perform:) view modifier to observe changes to scenePhase.

Compatibility: iOS 14.0+, macOS 11.0+, tvOS 14.0+, watchOS 7.0+

swift
import SwiftUI

struct DataManager {
    static func saveData() {
        print("App entering background, saving data...")
        // Simulate data saving
    }

    static func fetchData() {
        print("App becoming active, fetching new data...")
        // Simulate data fetching
    }
}

@main
struct ScenePhaseApp: App {
    @Environment("scenePhase") var scenePhase

    var body: some Scene {
        WindowGroup {
            ContentView()
        }
        .onChange(of: scenePhase) { newPhase in
            switch newPhase {
            case .active:
                print("App is active")
                DataManager.fetchData()
            case .inactive:
                print("App is inactive")
            case .background:
                print("App is in background")
                DataManager.saveData()
            @unknown default:
                print("Unknown scene phase")
            }
        }
    }
}

struct ContentView: View {
    var body: some View {
        Text("Observe app lifecycle in console")
            .font(.title)
    }
}

View Lifecycle Considerations in SwiftUI

While App and Scene protocols define the overarching application and window lifecycle, individual Views also have their own conceptual lifecycle. It's important to differentiate this from UIKit's viewDidLoad, viewWillAppear, etc., as SwiftUI operates differently. Swift UI views are structs and are lightweight; they are created and destroyed frequently as state changes. Instead of specific lifecycle methods, you react to changes in state or environment.

Key mechanisms for reacting to a view's state changes include:

  • onAppear(): Executed when a view appears on screen. This is a common place to fetch data or perform initial setup specific to that view.
  • onDisappear(): Executed when a view is removed from the screen (e.g., navigated away from, or condition making it visible becomes false). Use this for cleanup, stopping timers, or canceling network requests.
  • onChange(of:perform:): Reacts to changes in a specific value within your view or its environment. This is the most versatile way to observe and react to state changes.

It's crucial to remember that onAppear and onDisappear can be called multiple times during a view's existence, especially with complex navigation or conditional views. Avoid placing logic that should only run once the very first time the app launches within these modifiers. For app-launch specific logic, use the App struct's onChange(of: scenePhase:) modifier as discussed earlier.

Let's illustrate how onAppear and onDisappear work within a NavigationView stack.

Compatibility: iOS 13.0+, macOS 10.15+, tvOS 13.0+, watchOS 6.0+ (onChange(of:) requires iOS 14.0+)

swift
import SwiftUI

struct DetailView: View {
    let item: String

    var body: some View {
        Text("Detail for \(item)")
            .onAppear {
                print("DetailView for \(item) appeared")
            }
            .onDisappear {
                print("DetailView for \(item) disappeared")
            }
            .navigationTitle(item)
    }
}

struct ContentView: View {
    var body: some View {
        NavigationView {
            List {
                ForEach(0..<5) { index in
                    NavigationLink(destination: DetailView(item: "Item \(index)")) {
                        Text("Go to Item \(index)")
                    }
                }
            }
            .navigationTitle("My List")
        }
    }
}

Handling App-level Background Tasks and Events

While ScenePhase helps manage scene-level backgrounding, sometimes your app needs to execute code even when all its scenes are in the background or when the app is launched in the background (e.g., for a silent push notification). SwiftUI's App Lifecycle integrates with UIKit's capabilities for these advanced background tasks.

For persistent background operations like fetching new data periodically, you might still need to register background tasks. SwiftUI doesn't introduce its own API for this, but rather relies on UIKit's mechanisms. You can use UIBackgroundTasksScheduler (introduced in iOS 13) or the older setMinimumBackgroundFetchInterval for UIApplication.

To integrate these with the SwiftUI App Lifecycle, you'd typically perform the registration within your App struct, perhaps in an init() or an onAppear of your main WindowGroup.

For example, to register a background refresh task, you would import BackgroundTasks and use its API. It's common to have a dedicated manager object that handles these background operations.

Another important aspect is handling URL schemes or Universal Links when your app is launched. While onOpenURL(perform:) is the primary way to handle URLs within a SwiftUI View, if you need to process a URL upon app launch before any view is fully presented, you might still use the AppDelegate or inject a handler into your SwiftUI App structure.

Here's an example of registering a basic background task identifier. You also need to enable the "Background Fetch" and "Background Processing" capabilities in your project settings Signing & Capabilities tab for this to work correctly.

Compatibility: iOS 13.0+ (for BackgroundTasks), iOS 14.0+ (for App protocol usage).

swift
import SwiftUI
import BackgroundTasks

let backgroundAppRefreshTaskIdentifier = "com.yourapp.apprefresh"

struct BackgroundTasksManager {
    static func registerBackgroundTasks() {
        BGTaskScheduler.shared.register(forTaskWithIdentifier: backgroundAppRefreshTaskIdentifier, using: nil) {
            task in
            // This block is executed when the background task is launched.
            // You must schedule the next refresh and mark the task as complete.
            print("Background app refresh task launched!")
            handleAppRefresh(task: task as! BGAppRefreshTask)
        }
        print("Background tasks registered.")
    }

    static func scheduleAppRefresh() {
        let request = BGAppRefreshTaskRequest(identifier: backgroundAppRefreshTaskIdentifier)
        request.earliestBeginDate = Date(timeIntervalSinceNow: 60 * 15) // Request a refresh after 15 minutes

        do {
            try BGTaskScheduler.shared.submit(request)
            print("Background app refresh scheduled for at least 15 minutes from now.")
        } catch {
            print("Could not schedule app refresh: \(error)")
        }
    }

    static func handleAppRefresh(task: BGAppRefreshTask) {
        // Schedule the next background app refresh
        scheduleAppRefresh()

        // Perform your long-running operation here.
        // Ensure your task is finished within the allotted time (typically 30 seconds).
        let backgroundQueue = DispatchQueue.global(qos: .default)
        backgroundQueue.async {
            print("Performing background data fetch...")
            // Simulate network request or data processing
            Thread.sleep(forTimeInterval: 5)
            print("Background data fetch complete.")

            // You must call setTaskCompleted(success: true/false) when done
            task.setTaskCompleted(success: true)
        }

        // If your task supports it, provide an expiration handler.
        // The system will call this if the task runs too long.
        task.expirationHandler = {
            print("Background task expired! Stopping operations.")
            // Clean up any ongoing tasks
            task.setTaskCompleted(success: false)
        }
    }
}

@main
struct BackgroundApp: App {
    @Environment("scenePhase") var scenePhase

    init() {
        // Register background tasks early in the app's lifecycle.
        BackgroundTasksManager.registerBackgroundTasks()
    }

    var body: some Scene {
        WindowGroup {
            ContentView()
        }
        .onChange(of: scenePhase) { newPhase in
            if newPhase == .background {
                // Schedule a background refresh when the app goes to the background.
                BackgroundTasksManager.scheduleAppRefresh()
            }
        }
    }
}

struct ContentView: View {
    var body: some View {
        Text("App with background refresh enabled. \nSend app to background to trigger scheduling.")
            .font(.title2)
            .multilineTextAlignment(.center)
            .padding()
    }
}

Environment Values and State Management in the Lifecycle

SwiftUI's declarative nature relies heavily on its robust state management system, which integrates closely with the app lifecycle. EnvironmentValues play a crucial role, providing access to system-wide or inherited values, such as scenePhase, colorScheme, locale, and custom environment keys you define.

When your app transitions through different lifecycle phases (active, inactive, background), SwiftUI automatically updates relevant EnvironmentValues. Views observing these values with @Environment will automatically re-render or execute their onChange modifiers.

Beyond EnvironmentValues, several property wrappers manage different types of state, each with its implications for the lifecycle:

  • @State: Simple, local mutable state for a single view and its subviews. Views with @State are recreated frequently.
  • @Binding: A two-way connection to a mutable state owned by another view.
  • @ObservedObject: For reference types conforming to ObservableObject that contain observable state. When changes occur, the view is invalidated. You create these objects within the view that owns them, often using @StateObject.
  • @StateObject: Similar to @ObservedObject but designed for creating and owning an ObservableObject instance within a view's lifecycle. The object persists across view updates, making it ideal for persistent data managers or view models that need to survive view recreation. This is essential for preventing unnecessary re-initialization of complex objects.
  • @EnvironmentObject: Allows you to inject an ObservableObject deep into the view hierarchy without passing it through every initializer. It's suitable for app-wide shared data.

Understanding which property wrapper to use is key to efficient and correct state management that respects the SwiftUI App Lifecycle. For instance, if you have a data store that needs to persist throughout the app's lifetime and be accessible from multiple scenes, you might create it in your App struct and pass it down as an EnvironmentObject.

Compatibility: @State (iOS 13.0+), @ObservedObject (iOS 13.0+), @EnvironmentObject (iOS 13.0+), @StateObject (iOS 14.0+). EnvironmentValues for scenePhase (iOS 14.0+).

Here's an example demonstrating @StateObject and @EnvironmentObject in the context of the app lifecycle. Notice how AppWideSettings is created once in the App struct and then injected, ensuring it persists and can be accessed anywhere.

Compatibility: iOS 14.0+, macOS 11.0+

swift
import SwiftUI

// 1. App-wide settings (EnvironmentObject) - Persists for the app's lifetime
class AppWideSettings: ObservableObject {
    @Published var userName: String = "Guest"
    @Published var lastActiveDate: Date = Date()

    init() {
        print("AppWideSettings initialized")
    }

    func updateLastActiveDate() {
        lastActiveDate = Date()
        print("Last active date updated in AppWideSettings")
    }
}

// 2. View-specific data (StateObject) - Persists for the view's lifetime
class ViewModel: ObservableObject {
    @Published var counter: Int = 0

    init() {
        print("ViewModel initialized")
    }

    func increment() {
        counter += 1
    }

    deinit {
        print("ViewModel deinitialized")
    }
}

struct SettingsView: View {
    @EnvironmentObject var settings: AppWideSettings

    var body: some View {
        Form {
            TextField("Username", text: $settings.userName)
            Text("Last App Active: \(settings.lastActiveDate, formatter: DateFormatter.shortDateTime)")
        }
        .navigationTitle("Settings")
    }
}

struct MyContentView: View {
    @StateObject private var viewModel = ViewModel()
    @EnvironmentObject var appSettings: AppWideSettings // Access app-wide settings

    var body: some View {
        VStack(spacing: 20) {
            Text("Counter: \(viewModel.counter)")
                .font(.largeTitle)
            Button("Increment") {
                viewModel.increment()
            }
            Divider()
            Text("Hello, \(appSettings.userName)!")
            Text("App-level Last Active: \(appSettings.lastActiveDate, formatter: DateFormatter.shortDateTime)")
            
            NavigationLink("Go to Settings") {
                SettingsView()
            }
        }
        .onAppear {
            print("MyContentView appeared")
        }
        .onDisappear {
            print("MyContentView disappeared") // ViewModel is deinitialized if MyContentView is removed from hierarchy
        }
    }
}

@main
struct StateManagementApp: App {
    @StateObject private var appSettings = AppWideSettings()
    @Environment("scenePhase") var scenePhase

    var body: some Scene {
        WindowGroup {
            NavigationView {
                MyContentView()
            }
            .environmentObject(appSettings) // Inject appSettings into the environment
        }
        .onChange(of: scenePhase) { newPhase in
            if newPhase == .active {
                appSettings.updateLastActiveDate()
            }
        }
    }
}

extension DateFormatter {
    static let shortDateTime: DateFormatter = {
        let formatter = DateFormatter()
        formatter.dateStyle = .short
        formatter.timeStyle = .short
        return formatter
    }()
}

Advanced Lifecycle Customization: AppDelegate and UISceneDelegate Bridging

While SwiftUI's App protocol handles most modern lifecycle events, there are still scenarios where you might need to drop down to UIKit's AppDelegate or UISceneDelegate methods. This is particularly true for:

  • Integrating third-party SDKs that require application:didFinishLaunchingWithOptions: or scene:willConnectToSession:options:.
  • Handling specific push notification payloads (application:didReceiveRemoteNotification: with content-available: 1).
  • Customizing initializers that are not directly exposed in the App protocol, like early app setup tasks.
  • Deep linking or universal links if onOpenURL isn't sufficient for complex routing logic that needs to occur very early.

To bridge the gap, you can use the @UIApplicationDelegateAdaptor property wrapper. This allows you to designate a traditional AppDelegate subclass to handle specific events that the SwiftUI App lifecycle doesn't natively expose.

When using @UIApplicationDelegateAdaptor, your AppDelegate instance will receive the traditional UIApplicationDelegate messages, allowing you to execute UIKit-specific setup or respond to events that fire before the SwiftUI App structure is fully initialized. Note that UISceneDelegate methods within AppDelegate are typically for multi-scene UIKit apps, but some legacy SDKs might still refer to them.

It's a good practice to minimize the logic within AppDelegate and SceneDelegate and push as much as possible into your SwiftUI App and Scene hierarchy for a more consistent and declarative approach. However, @UIApplicationDelegateAdaptor provides a powerful escape hatch when necessary.

Compatibility: iOS 14.0+, macOS 11.0+, tvOS 14.0+, watchOS 7.0+

swift
import SwiftUI
import UIKit
import UserNotifications // For push notifications

// Define your custom AppDelegate
class AppDelegate: NSObject, UIApplicationDelegate, UNUserNotificationCenterDelegate {
    func application(
        _ application: UIApplication,
        didFinishLaunchingWithOptions launchOptions: [UIApplication.LaunchOptionsKey: Any]? = nil
    ) -> Bool {
        print("AppDelegate didFinishLaunchingWithOptions")
        // Example:
        // Configure a third-party SDK that requires early initialization
        // ThirdPartySDK.shared.initialize(apiKey: "YOUR_API_KEY")
        
        // Register for push notifications (if not done in SwiftUI)
        UNUserNotificationCenter.current().delegate = self
        UNUserNotificationCenter.current().requestAuthorization(options: [.alert, .sound, .badge]) { granted, error in
            print("Notification permission granted: \(granted)")
            guard granted else { return }
            DispatchQueue.main.async {
                UIApplication.shared.registerForRemoteNotifications()
                print("Registered for remote notifications")
            }
        }
        
        return true
    }

    func application(
        _ application: UIApplication,
        configurationForConnecting connectingSceneSession: UISceneSession,
        options: UIScene.ConnectionOptions
    ) -> UISceneConfiguration {
        print("AppDelegate configurationForConnecting")
        // This method is called when a new scene session is being created.
        // If you're using SwiftUI's App lifecycle, this might not be strictly necessary to implement
        // unless you need custom UIKit-backed scene configurations.
        return UISceneConfiguration(name: "Default Configuration", sessionRole: connectingSceneSession.role)
    }

    // MARK: - Push Notification Delegate Methods
    func application(
        _ application: UIApplication,
        didRegisterForRemoteNotificationsWithDeviceToken deviceToken: Data
    ) {
        let tokenParts = deviceToken.map { String(format: "%02.2hhx", $0) }
        let token = tokenParts.joined()
        print("Device Token: \(token)")
        // Send this token to your backend server
    }

    func application(
        _ application: UIApplication,
        didFailToRegisterForRemoteNotificationsWithError error: Error
    ) {
        print("Failed to register for remote notifications: \(error.localizedDescription)")
    }
    
    // Handle notifications when the app is in the foreground
    func userNotificationCenter(
        _ center: UNUserNotificationCenter,
        willPresent notification: UNNotification,
        withCompletionHandler completionHandler: @escaping (UNNotificationPresentationOptions) -> Void
    ) {
        print("Notifications will present in foreground: \(notification.request.content.userInfo)")
        // If you want to display an alert, sound, or badge while the app is in the foreground
        completionHandler([.banner, .sound])
    }

    // Handle user tap on notification
    func userNotificationCenter(
        _ center: UNUserNotificationCenter,
        didReceive response: UNNotificationResponse,
        withCompletionHandler completionHandler: @escaping () -> Void
    ) {
        print("User Tapped on Notification: \(response.notification.request.content.userInfo)")
        // Perform actions based on the notification payload
        completionHandler()
    }
}

@main
struct CustomAppDelegateApp: App {
    // Use @UIApplicationDelegateAdaptor to integrate your AppDelegate
    @UIApplicationDelegateAdaptor(AppDelegate.self) var appDelegate

    var body: some Scene {
        WindowGroup {
            ContentView()
        }
    }
}

struct ContentView: View {
    var body: some View {
        Text("Check console for AppDelegate and Push Notification logs.")
            .font(.title2)
            .multilineTextAlignment(.center)
            .padding()
            .onAppear {
                // Example of requesting notification authorization directly in SwiftUI view
                // For complex handling or background notifications, AppDelegate might still be preferred.
                // UNUserNotificationCenter.current().requestAuthorization(options: [.alert, .sound, .badge]) { granted, error in
                //     print("SwiftUI: Notification permission granted: \(granted)")
                // }
            }
    }
}

Frequently Asked Questions

What is the primary entry point for a SwiftUI application?
The primary entry point for a SwiftUI application, especially those targeting iOS 14.0 and later, is a type that conforms to the `App` protocol, declared with the `@main` attribute. Its `body` property returns one or more `Scene`s that define the app's UI.
How do I detect when my SwiftUI app goes to the background or comes to the foreground?
You can detect these lifecycle events by observing the `scenePhase` environment value. Use `@Environment("scenePhase") var scenePhase` in your `App` or `Scene` body, and then attach an `onChange(of: scenePhase)` modifier to perform actions when the phase changes to `.active`, `.inactive`, or `.background`.
When should I use `@StateObject` versus `@ObservedObject`?
`@StateObject` should be used when a view *owns* the `ObservableObject` instance and needs it to persist throughout the view's lifetime, even if the view itself is recreated. `@ObservedObject` should be used when a view *observes* an `ObservableObject` that is owned by another source (e.g., passed down from a parent view or created elsewhere). Using `@ObservedObject` for ownership can lead to unexpected re-initialization.
Can I still use `AppDelegate` or `SceneDelegate` in a SwiftUI app?
Yes, you can. For scenarios that aren't natively covered by SwiftUI's `App` lifecycle (e.g., integrating certain third-party SDKs, custom deep link handling, or specific push notification events), you can use the `@UIApplicationDelegateAdaptor` property wrapper within your SwiftUI `App` struct to bridge to a traditional `AppDelegate` subclass.
How do I perform background tasks in a SwiftUI application?
SwiftUI applications use the same `BackgroundTasks` framework (or older `UIApplication` background fetch APIs) as UIKit apps. You'll typically register your background task identifiers within your `App` struct's `init()` or when your `WindowGroup` appears, and then schedule tasks when the app enters the background (e.g., using `onChange(of: scenePhase)`).
What's the difference between `onAppear()`/`onDisappear()` and `onChange(of:perform:)`?
`onAppear()` and `onDisappear()` respond specifically to a view being added to or removed from the screen hierarchy. `onChange(of:perform:)`, available from iOS 14, responds to changes in *any* observed value (e.g., `@State`, `@Binding`, `@Environment`, `ObservedObject` properties) within the view's data or environment, regardless of whether the view itself is appearing or disappearing. `onChange` is generally more versatile for reacting to specific state transitions.
#SwiftUI#App Lifecycle#iOS 14+#ScenePhase#Environment#State Management